Certainly useless but not worthless.
Materials :
- Netduino plus 2 (60$)
- Simple coffee machine (25$)
- 3 Male-Male jumper wires
- 3 Female-Female jumper wires
- Or 3 Male-Female jumper wires
- Ethernet cable
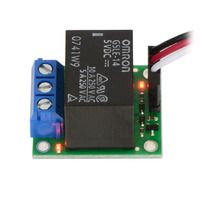
- Pololu Basic SPDT Relay Carrier with 5VDC Relay (4$)
- Usb cable
- VS.Net 2010 (or the free VS.Net express)
- (Optional) Wifi N Range Extender (DAP-1360) (60$)
Intro :
Here I am, creating a new blog on a premise to show how simple it was to build a wifi coffee machine. I had no intentions to post a "How-to" on that, but some dudes suggest me to share it and I found this was not a bad idea.
I want to clarify that practically anyone can do it easily in one weekend, even if you have little or no experience in coding or soldering. For my experience, before I started that "Weekend" I had no experience in soldering and 2 weeks of experimentations with the netduino. For the programming part, its my job so I have tons of it! But don't panic if you don't, I'll post my programming code.


Theres lots of comments in the programs files to help you out.

I want to clarify that practically anyone can do it easily in one weekend, even if you have little or no experience in coding or soldering. For my experience, before I started that "Weekend" I had no experience in soldering and 2 weeks of experimentations with the netduino. For the programming part, its my job so I have tons of it! But don't panic if you don't, I'll post my programming code.
How-to :
- You have to find a simple coffee maker, ideally with just one push button or switch. Like this one or my old one on the right.

- Then remove the switch, and disconnect the wires link to the switch.

- In my case, 3 wires connected to the switch, two browns (positive) for interrupting the circuit and one blue for illuminating the led on the switch when current running in the circuit. In the majority of cases, there is only 2 wires connected to the switch, one (+) in and one (+) out.

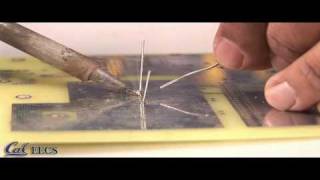
- Now, this was the most difficult part for me, the soldering. Open the Pololu pack with the relay and solder the parts together, or you can use you're own switch, transistor, diode package. I use the pololu pack because it was easier for me to do it, but build your own its not that tough, lots of tutorial on the net.
If you need help to solder, here's a nice tutorial on youtube. Thats the one I
watched before I soldered the relay.
watched before I soldered the relay.
- Now you should have your relay switch ready.

- You have to screw the wire from the outlet, one of the two browns wires (you have to look inside your coffee maker to have the good one) in the COM port of the relay. The other brown wire, you have to screw it in the NO (normally open) port of the relay.

- The wires schematic is pretty simple for the netduino part also.
- Relay GND to the Netduino GND port
- Relay VDD to the Netduino 5V port
- Relay EN to the Netduino 9Pin port

- Here's the coding part. The easiest part for some the hardest one for others ;)
- In Visual Studio create a <NetDuino plus 2> project and add these 3 files to the project.
Theres lots of comments in the programs files to help you out.
- Plug your netduino to the usb port on your computer and press F5, for compiling the code and uploading to the micro controller platform.
- Plug the ethernet wire from the wifi extender or the router in the netduino.
- You can look in Visual Studio for the ip adress of the netduino or look into the router configuration.

- When everything is hook up you can try these commands
- http://<your ip address>/START
- http://<your ip address>/STOP
- http://<your ip address>/STATUS
- You should see your coffee start and close with a response in your browser saying that your coffee is brewing or in standby.
Enjoy a good cup of geek coffee ;)
*Part of the coding lines is from "Getting started with the Netduino" from Chris Walker.
Great to find a coffee maker that can be controlled through WiFi connectivity.So is this machine fully automatic.
ReplyDeleteThanks
Finn Felton
Kopi Luwak
Yes as automatic you can turn it on or off if you have access to internet! You still have to grind your kopi luwak beans. ;)
ReplyDeletethank you , just hooked up the same to my room heater via mqtt , so that I can start my room heating when I start from my office :)
ReplyDeleteGreat Coffee Makers very nice post.
ReplyDeleteThis short article posted only at the web site is truly good.
ReplyDeleteallthingscoffee.info
This comment has been removed by a blog administrator.
ReplyDeleteGreat post it helps me a lot, I'm impressed; Your idea is outstanding; the issue is something that not enough people are speaking intelligently about. I am pleased that I stumbled across this in my search for something relating to this.I also write a review here Keurig B60 Coffee Maker
ReplyDelete